
If you want to watch live TV, movies, series, sports, and other streaming content on an Android device, IPTV can be a convenient option. Unlike traditional cable or satellite television, IPTV delivers television content over an internet connection, allowing you to watch your subscribed channels on compatible devices.
Setting up IPTV on Android is generally straightforward. Whether you are using an Android smartphone, Android tablet, Android TV, Google TV device, or Android TV box, the basic process involves choosing a compatible IPTV player, installing it, entering the credentials provided by your IPTV provider, and configuring your connection.
In this guide, we explain how to setup IPTV on Android devices step by step, including what you need before starting, how to install an IPTV player, how to add your IPTV subscription, how to troubleshoot common problems, and how to improve your streaming experience.
Important: IPTV technology itself is legal and is simply a method of delivering television content over the internet. Make sure you use an IPTV service and content that you are legally entitled to access in your location.
What Do You Need to Setup IPTV on Android?
Before you begin the setup process, make sure you have everything you need.
1. A Compatible Android Device
You can usually configure IPTV on many Android-based devices, including:
- Android smartphones
- Android tablets
- Android TV
- Google TV devices
- Android TV boxes
- Compatible smart TVs running Android TV or Google TV
The exact menus and installation process may vary depending on your device manufacturer and Android version.
2. A Stable Internet Connection
IPTV relies on internet connectivity, so a reliable connection is important for smooth playback.
For the best experience, use a stable Wi-Fi connection or Ethernet connection when available.
A wired Ethernet connection can be particularly useful for Android TV boxes because it can provide a more consistent connection than weak or congested Wi-Fi.
3. An IPTV Subscription
You also need an IPTV subscription from a provider that offers content you are legally permitted to access.
Your provider may give you one or more of the following:
- M3U playlist URL
- Xtream Codes credentials
- Username and password
- Server or portal URL
- EPG URL
The exact information depends on the IPTV service and the IPTV player you choose.
4. An IPTV Player
An IPTV subscription normally does not work by itself. You generally need an IPTV player or compatible application to load and play your provider's content.
Different IPTV players support different methods, so check which login format your provider supplies before choosing an application.
How to Setup IPTV on Android Devices
The following process explains the basic setup from beginning to end.
Step 1: Connect Your Android Device to the Internet
Start by connecting your Android device to a reliable internet connection.
On most Android devices, open:
Settings → Network & Internet → Wi-Fi
Select your Wi-Fi network and enter the password.
If your Android TV box supports Ethernet, you can also connect it directly to your router using an Ethernet cable.
Once connected, test your internet connection by opening a website or streaming a video.
Step 2: Choose an IPTV Player for Android
The next step is to install an IPTV player.
An IPTV player is an application that reads the information provided by your IPTV service and displays the available channels and content.
When selecting an IPTV player, consider features such as:
- Android compatibility
- Easy navigation
- Electronic Program Guide support
- Multiple playlist support
- Favorites
- Search functionality
- Parental controls
- Subtitle support
- External player compatibility
- Compatibility with your provider's login method
Not every IPTV application works with every subscription format, so check your provider's instructions.
Step 3: Install the IPTV App
On Android devices with access to the official Google Play Store, open the Play Store and search for your chosen IPTV player.
Select the appropriate application and choose Install.
Once the installation is complete, select Open.
On Android TV
The process is similar.
From the Android TV home screen:
- Open the Google Play Store.
- Select the search option.
- Search for your preferred IPTV player.
- Select the application.
- Choose Install.
- Open the application after installation.
The exact interface can differ depending on the Android TV version and manufacturer.
Step 4: Open Your IPTV Player
After installing the application, launch it.
The first screen may ask you to choose a method for adding your IPTV service.
Common options include:
- Login with Xtream Codes
- M3U playlist
- Playlist URL
- Portal URL
- API login
- Local playlist
Choose the option supported by your IPTV provider.
Step 5: Add Your IPTV Subscription
This is one of the most important parts of the setup.
Your IPTV provider should give you the required login details or playlist information.
For example, if your provider supports an Xtream Codes-style login, you may be asked for:
Username: Your provided username
Password: Your provided password
Server/URL: Your provider's server address
Enter the information exactly as provided.
If your provider gives you an M3U URL instead, choose the playlist or M3U option and enter the supplied URL.
Tip: Check Your Credentials Carefully
A single incorrect character can prevent your playlist from loading.
Make sure you check:
- Username spelling
- Password spelling
- Server URL
- Spaces before or after information
- Uppercase and lowercase characters
- Special characters
If the login does not work, contact your IPTV provider to confirm the credentials.
Step 6: Wait for Your Channels to Load
After entering your information, select Login, Add User, Connect, or the equivalent button in your IPTV player.
The application may take a few moments to download your channel list.
Depending on your subscription, you may see categories such as:
- Live TV
- Movies
- Series
- Sports
- News
- Kids
- International
- Favorites
- Video on Demand
The categories available depend on your IPTV provider.
Step 7: Open a Channel
Once your playlist has loaded, open the Live TV or Channels section.
Select a channel from the available list.
The IPTV player should begin loading the stream.
If the channel plays correctly, your Android IPTV setup is complete.
How to Setup IPTV on Android TV
Android TV provides a particularly convenient IPTV experience because it is designed for television screens and remote controls.
The general setup process is:
1. Connect Android TV to the internet
Go to your network settings and connect to Wi-Fi or Ethernet.
2. Open Google Play Store
Use your remote to open the Google Play Store.
3. Install a compatible IPTV player
Search for an IPTV application that supports your provider's login method.
4. Launch the application
Open the IPTV player from your Android TV applications.
5. Enter your subscription details
Use the M3U URL, Xtream Codes credentials, or another supported method supplied by your provider.
6. Load your playlist
Wait while the application downloads your available categories and channels.
7. Start streaming
Select a channel and wait for playback to begin.
This makes Android TV one of the easiest platforms for users who prefer watching IPTV on a large screen.
How to Setup IPTV on an Android Phone
You can also use IPTV on an Android smartphone.
The process is similar to Android TV, although the interface is optimized for touchscreens.
Android phone setup:
- Connect your phone to Wi-Fi or mobile data.
- Open the Google Play Store.
- Install a compatible IPTV player.
- Launch the application.
- Select the appropriate login method.
- Enter your IPTV subscription details.
- Load your playlist.
- Choose a channel.
- Start watching.
For longer streaming sessions, Wi-Fi is generally preferable to mobile data because IPTV video can consume significant amounts of data.
How to Setup IPTV on an Android Tablet
Android tablets work in much the same way as Android smartphones.
Install a compatible IPTV application from the Play Store, enter your subscription details, and load your playlist.
The larger tablet display can make browsing channel categories and TV guides more comfortable than using a smartphone.
For the best experience:
- Use a stable Wi-Fi connection.
- Keep your IPTV application updated.
- Avoid running too many demanding applications simultaneously.
- Keep enough storage available for application updates and device performance.
How to Setup IPTV on an Android TV Box
Android TV boxes are another popular option for IPTV streaming.
To set up IPTV on an Android TV box:
Step 1: Connect the box
Connect your Android TV box to your television using the appropriate HDMI connection.
Step 2: Connect to the internet
Use Wi-Fi or Ethernet.
Step 3: Open the Play Store
Sign in if necessary and open the Google Play Store.
Step 4: Install your IPTV player
Search for a compatible IPTV application and install it.
Step 5: Add your IPTV subscription
Enter the credentials or playlist URL provided by your IPTV service.
Step 6: Load the playlist
Allow the application to download the available content.
Step 7: Test playback
Open several channels to confirm that the service is working correctly.
M3U vs Xtream Codes: Which Should You Use?
When setting up IPTV, you may encounter different login methods.
Two common options are M3U playlists and Xtream Codes-style credentials.
M3U Playlist
An M3U playlist is generally provided as a URL containing information about available streams.
Your IPTV player imports the playlist and organizes the available channels.
An M3U setup may look conceptually like:
Playlist URL → IPTV Player → Channel List → Playback
You normally do not need to manually add individual channels.
Xtream Codes Login
Some IPTV players allow users to enter:
- Username
- Password
- Server URL
This can be convenient because the application may automatically organize live channels, movies, series, and other categories supported by the service.
Which One Is Better?
Neither method is universally better.
The best choice depends on what your IPTV provider supports and what your chosen IPTV player accepts.
If your provider gives you both options, choose the method that provides the features and interface you prefer.
How to Improve IPTV Streaming on Android
Having a good IPTV subscription is only one part of a smooth streaming experience. Your device, network, and application settings can also affect playback.
Here are several ways to improve IPTV performance.
Use a Stable Internet Connection
A weak or unstable connection can result in:
- Buffering
- Freezing
- Video quality drops
- Connection errors
- Playback interruptions
If possible, position your Android TV device close to your Wi-Fi router or use Ethernet.
Restart Your Router
If IPTV suddenly starts buffering, restarting your router can sometimes resolve temporary network problems.
Turn the router off, wait briefly, and restart it.
Allow the connection to stabilize before testing IPTV again.
Restart Your Android Device
If the IPTV application becomes slow or unresponsive, restart your Android device.
This can clear temporary processes and free system resources.
Clear the IPTV App Cache
If your IPTV application is behaving unusually, clearing its cache may help.
On many Android devices, you can find this under:
Settings → Apps → [Your IPTV App] → Storage → Clear Cache
The exact menu can vary by Android version.
Be careful when selecting Clear Data, because this may remove saved login information and application settings.
Keep Your Android Device Updated
Install available Android system and application updates when appropriate.
Updates can improve:
- Stability
- Compatibility
- Security
- Performance
Keep Your IPTV Player Updated
If the IPTV application has an available update, installing it may resolve bugs or compatibility issues.
Recommended Internet Speed for IPTV
The amount of bandwidth required depends on video resolution, compression, network conditions, and the streaming service.
As a general guideline:
| Video Quality | Suggested Internet Speed |
|---|---|
| SD | 5 Mbps+ |
| HD | 10 Mbps+ |
| Full HD | 15 Mbps+ |
| 4K | 25 Mbps+ |
These are general guidelines rather than guarantees. A stable connection with low congestion can perform better than a faster but unstable connection.
If several people are using the same network at the same time, you may need additional bandwidth.
For example, someone watching IPTV while another person is downloading large files or streaming 4K video can affect available bandwidth.
IPTV Buffering on Android: Common Causes and Solutions
Buffering is one of the most common IPTV problems.
There are several possible causes.
Problem 1: Slow Internet
If your connection is too slow for the selected video quality, buffering can occur.
Solution: Test your internet connection and, if necessary, reduce other network activity.
Problem 2: Weak Wi-Fi Signal
Your Android TV box may be too far from your router.
Solution: Move the device closer to your router or consider Ethernet.
Problem 3: Network Congestion
Multiple devices using the same network can reduce available bandwidth.
Solution: Pause large downloads and unnecessary streaming sessions.
Problem 4: IPTV Server Issues
Sometimes the problem is not your device or internet connection. The streaming server may be experiencing temporary issues.
Solution: Test another channel. If only one channel has problems, the issue may be specific to that stream.
Problem 5: Application Problems
An outdated or malfunctioning IPTV player can also cause playback problems.
Solution: Restart the application, clear its cache, or update/reinstall the application.
IPTV Login Not Working on Android
If your IPTV credentials are not working, check the following.
Verify Your Username
Make sure the username matches the information provided by your IPTV service.
Check Your Password
Passwords are often case-sensitive.
Check the Server URL
Make sure you entered the correct server address.
Check Your Subscription
Your subscription may have expired or reached a device limit.
Check Your Player
Your IPTV player may not support the login format supplied by your provider.
If everything appears correct but you still cannot connect, contact your IPTV provider.
IPTV Playlist Not Loading on Android
If your playlist does not load, several things could be responsible.
First, confirm that your internet connection is working.
Next, verify the playlist URL or login information.
You should also check whether the playlist has expired or whether your provider has changed its server address.
If possible, test the same credentials in a compatible IPTV player.
If the playlist works elsewhere, the issue may be related to the application rather than your subscription.
How to Organize IPTV Channels on Android
A large IPTV playlist can contain thousands of channels, making navigation difficult.
Many IPTV players offer features that can make browsing easier.
Use Favorites
Add frequently watched channels to your favorites list.
Use Categories
Browse categories such as:
- Sports
- News
- Entertainment
- Movies
- Kids
- International
Use Search
If your IPTV player has a search feature, use it to find channels quickly.
Use the EPG
An Electronic Program Guide, commonly called an EPG, can display information about current and upcoming programs when supported by your provider and IPTV player.
Is IPTV Available on All Android Devices?
Most modern Android devices can run compatible IPTV applications, but compatibility can vary.
Factors that can affect compatibility include:
- Android version
- Device hardware
- Screen resolution
- Application requirements
- Google Play Store availability
- DRM support
- IPTV player compatibility
Before purchasing an Android TV box specifically for IPTV, check that it supports the applications and video formats you intend to use.
Can You Use IPTV on Multiple Android Devices?
Whether you can use the same IPTV subscription on multiple devices depends on your provider's terms.
Some subscriptions allow multiple simultaneous connections, while others may be limited to one active device or connection.
If you want to use IPTV on several Android devices, check the provider's multi-device policy before attempting to connect them simultaneously.
How to Get the Best IPTV Experience on Android TV
For a better overall experience, consider the following setup:
Use Ethernet When Possible
A wired connection can reduce Wi-Fi-related instability.
Use a Good IPTV Player
Choose a player that supports the features you actually need.
Keep Your Device Updated
Regular updates can improve compatibility and security.
Avoid Overloading Your Android TV Box
Too many applications running in the background can affect performance on lower-powered devices.
Use Favorites
Create a favorites list containing the channels you watch most often.
Check Your Network
If several devices are connected to your home network, make sure your internet connection can handle the combined traffic.
Is IPTV Better Than Traditional TV?
IPTV and traditional television have different advantages.
Traditional cable or satellite services can offer dedicated infrastructure and bundled television packages, while IPTV provides internet-based delivery and can offer greater flexibility across compatible devices.
With IPTV, you may be able to watch content on:
- Smart TVs
- Android TV
- Smartphones
- Tablets
- Streaming devices
- TV boxes
However, IPTV performance depends heavily on your internet connection and the quality of the streaming service.
For users with a reliable internet connection, IPTV can be a flexible alternative for accessing television content.
Frequently Asked Questions About IPTV on Android
How do I setup IPTV on Android?
To set up IPTV on Android, install a compatible IPTV player, open the application, choose the login method supported by your provider, enter your subscription credentials or M3U playlist URL, load the playlist, and select a channel.
Can I install IPTV on Android TV?
Yes. Android TV supports many compatible IPTV applications. You can generally install an IPTV player through the Google Play Store and then add your IPTV subscription.
Can I use IPTV on my Android phone?
Yes. Many IPTV players are designed to work on Android smartphones. Install a compatible application, add your subscription information, and start streaming.
Can I use IPTV on an Android TV box?
Yes. Android TV boxes can run compatible IPTV applications. Connect the box to your television and internet, install your IPTV player, and add your subscription.
Do I need an IPTV player?
In most cases, yes. An IPTV subscription typically provides access credentials or playlist information, while an IPTV player is the application used to organize and play the streams.
Why is IPTV buffering on my Android device?
Buffering can be caused by slow or unstable internet, weak Wi-Fi, network congestion, device performance, application problems, or issues with the streaming source.
Does IPTV work without Wi-Fi?
IPTV requires an internet connection. On an Android smartphone, you can use mobile data instead of Wi-Fi, although streaming can consume a significant amount of data.
Can I watch IPTV in 4K on Android?
You can watch 4K content if your Android device, IPTV player, internet connection, display, and the specific stream all support 4K.
How much internet speed do I need for IPTV?
The required speed depends on video quality and network conditions. As a general guideline, HD streaming may require around 10 Mbps or more, while 4K streaming can require around 25 Mbps or more.
Can I use one IPTV subscription on multiple Android devices?
That depends on your IPTV provider's subscription policy. Some providers support multiple connections, while others restrict simultaneous usage.
Final Thoughts: Setting Up IPTV on Android
Learning how to setup IPTV on Android devices does not have to be complicated.
The basic process is simple:
- Connect your Android device to the internet.
- Choose a compatible IPTV player.
- Install the application.
- Open the IPTV player.
- Enter your provider's credentials or playlist URL.
- Load your channels.
- Select a channel and start streaming.
For the best experience, use a stable internet connection, keep your Android device and IPTV application updated, and choose an IPTV player that supports your provider's login method.
Whether you are using an Android smartphone, tablet, Android TV, Google TV device, or Android TV box, Android provides a flexible platform for IPTV streaming.
If you're looking for a reliable IPTV experience, explore the IPTV solutions available from StreamVexo and choose a subscription that matches your viewing needs and compatible devices.
Quick Android IPTV Setup Checklist
Before you start watching, make sure you have:
☑ Compatible Android device
☑ Stable internet connection
☑ IPTV subscription
☑ Compatible IPTV player
☑ M3U URL or login credentials
☑ Updated Android software
☑ Updated IPTV application
Once these are ready, you can complete your Android IPTV setup in just a few minutes.
If you want to watch IPTV on an Apple device, setting up your IPTV service is usually straightforward. With a compatible IPTV player such as IPTV Smarters Pro, you can access your IPTV subscription on devices such as an iPhone, iPad, or Apple TV.
In this guide, we'll explain how to set up IPTV on Apple devices step by step, from downloading the IPTV player to entering your subscription information and organizing your channels.
Important: IPTV Smarters Pro is a media player. You need a valid IPTV subscription and the login information provided by your IPTV service provider.
What You Need Before Setting Up IPTV
Before starting the installation, make sure you have the following:
- An iPhone, iPad, or compatible Apple TV.
- A stable internet connection.
- IPTV Smarters Pro or another compatible IPTV player.
- An active IPTV subscription.
- Your IPTV username.
- Your IPTV password.
- The server or playlist URL provided by your IPTV provider.
Your IPTV provider should give you the necessary login information after you subscribe.
Once you have these details ready, you can begin the setup.
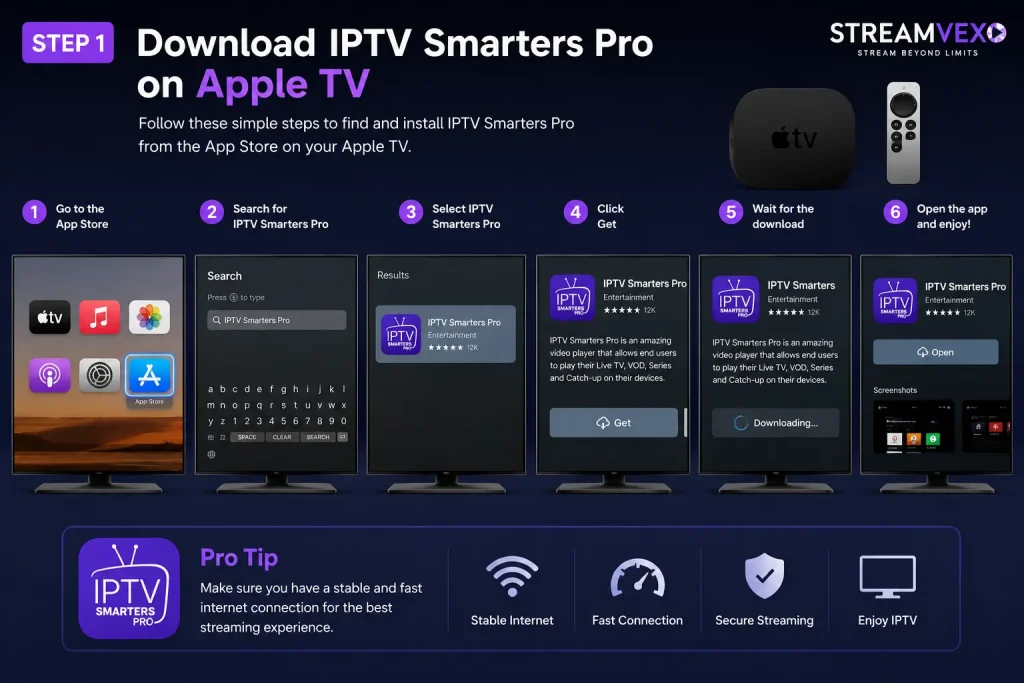
Step 1: Download IPTV Smarters Pro
The first step is to install a compatible IPTV player on your Apple device.
On an iPhone or iPad:
- Open the App Store.
- Tap the Search icon.
- Search for IPTV Smarters Pro.
- Find the appropriate application in the search results.
- Tap Get or the download button.
- Wait for the application to install.
After the installation is complete, you can open the application from your home screen.
Step 2: Open the App and Accept the Terms
After installing the application, open IPTV Smarters Pro.
Depending on the current version of the application, the first screen may ask you to review and accept its terms.
Follow these steps:
- Open IPTV Smarters Pro.
- Review the application's terms.
- Tap Accept to continue.
- Continue to the login or account setup screen.
The exact appearance of the application may change as the developer releases updates, but the basic setup process is generally similar.
Step 3: Enter Your IPTV Subscription Details
After opening the application, you'll need to connect it to your IPTV subscription.
Your IPTV provider should give you the required credentials.
Depending on the connection method offered by your provider, you may need to enter:
- Any name or profile name.
- Username.
- Password.
- Server or playlist URL.
Enter the information carefully.
A single incorrect character in your username, password, or server address can prevent the service from connecting properly.
After entering the information, select Add User, Login, or the equivalent option shown in your version of the application.
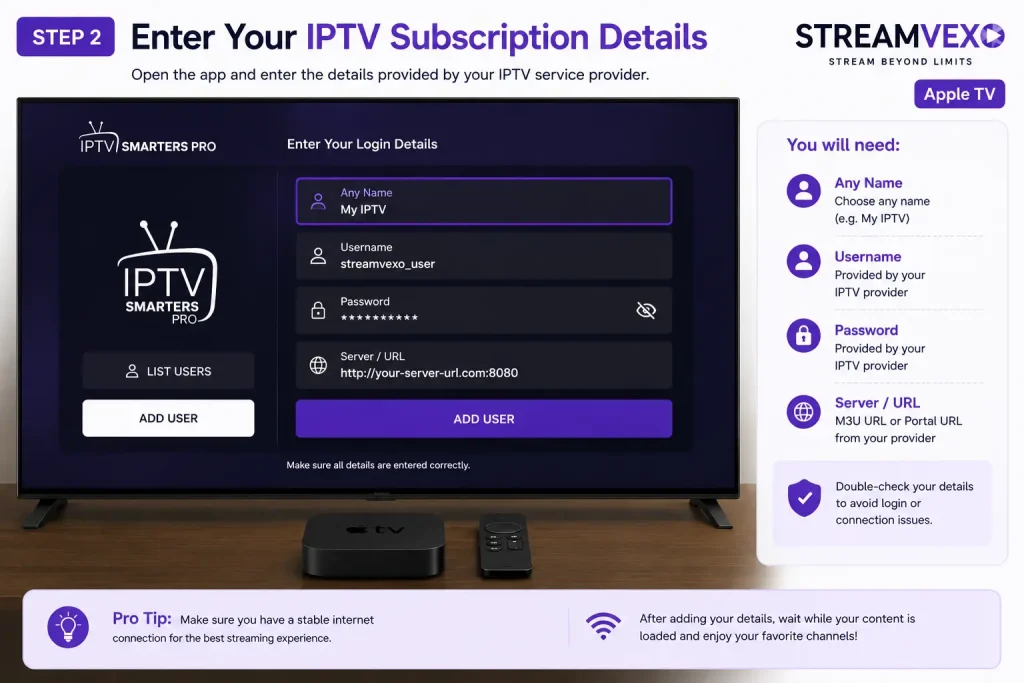
Important: Don't use a real customer's username, password, or private IPTV URL in the screenshot. Use example information instead.
Step 4: Wait for Your IPTV Content to Load
Once your login information has been submitted, the application will attempt to connect to your IPTV service.
If the credentials are correct and your subscription is active, your available content should begin loading.
Depending on your IPTV subscription, you may see categories such as:
- Live TV.
- Movies.
- TV Series.
- Catch Up.
- Electronic Program Guide (EPG).
- Favorites.
The available categories depend on your IPTV provider and subscription.
If nothing loads, don't worry. Check your username, password, server URL, and internet connection first.
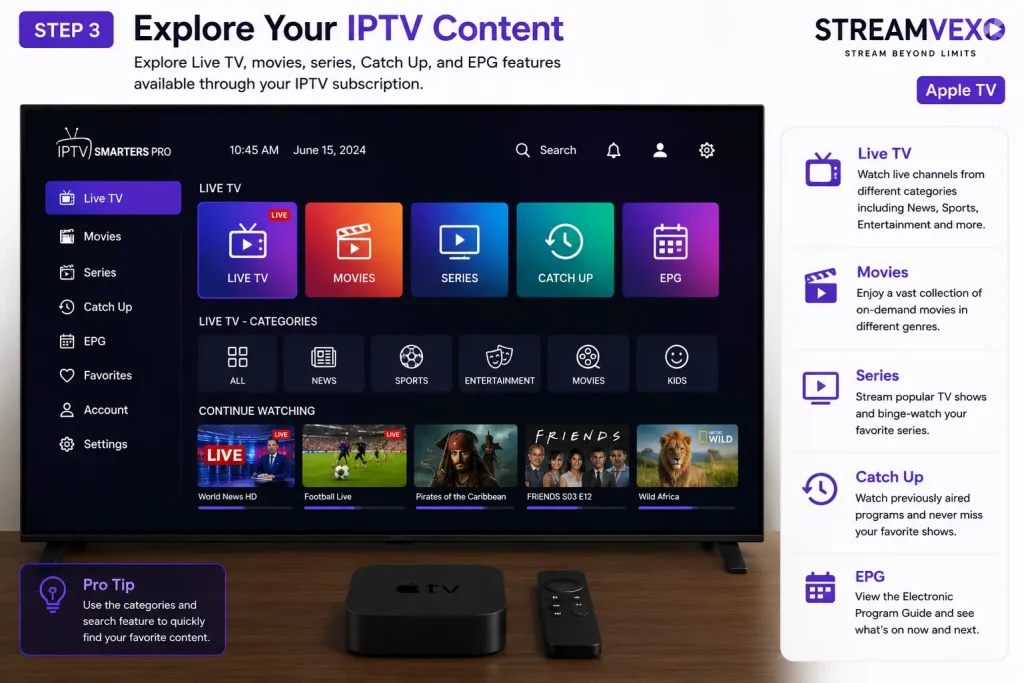
Step 5: Explore the IPTV Smarters Pro Interface
After your subscription has loaded successfully, you'll be taken to the main interface.
The exact layout can vary depending on the version of the application and device you're using.
Live TV
The Live TV section lets you browse the live channels included with your IPTV subscription.
You can normally browse channels by category and select a channel to start streaming.
Movies
If your subscription includes video-on-demand content, the Movies section may provide access to available movies.
Series
The Series section can contain TV shows and other episodic content when supported by your IPTV service.
Catch Up
Some IPTV services offer a Catch Up feature that allows you to watch previously broadcast programs.
Availability depends on your IPTV provider.
EPG
The Electronic Program Guide (EPG) can display channel schedules and program information when supported by your IPTV service.
Step 6: Organize Your Channels
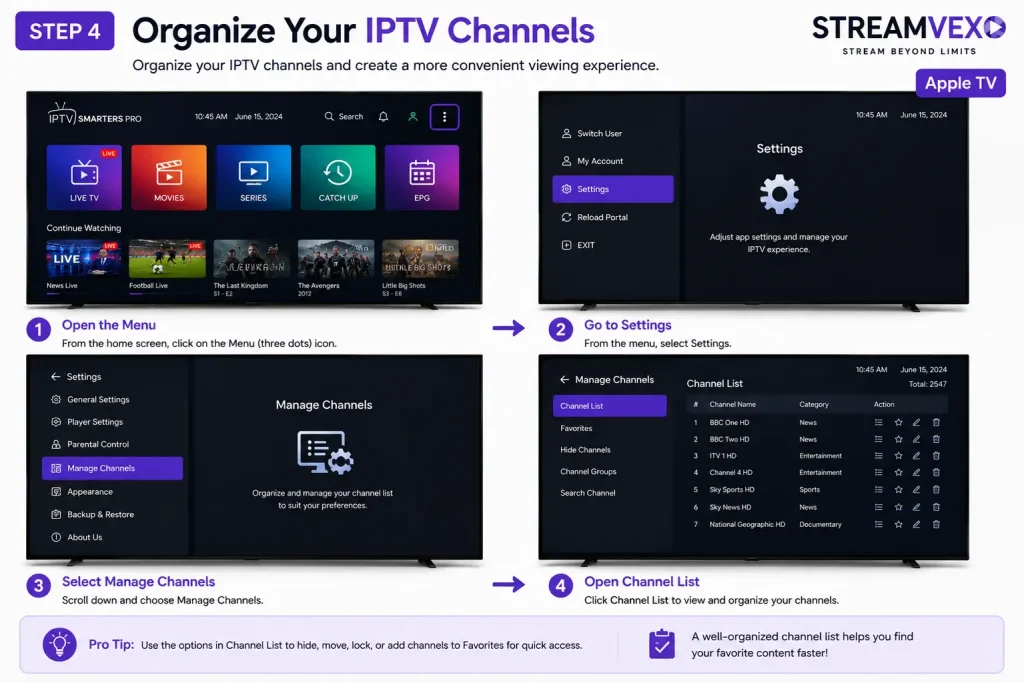
If you have a large number of channels, organizing your list can make IPTV much easier to use.
Depending on the version of IPTV Smarters Pro you're using, you may be able to manage your channel categories or favorites through the application settings.
A typical process may look like this:
- Open the application's menu.
- Select Settings.
- Look for Manage Channels or a similar option.
- Choose the category or channel list you want to manage.
- Organize your channels or add frequently watched channels to your favorites.
The available options may differ depending on your device and application version.
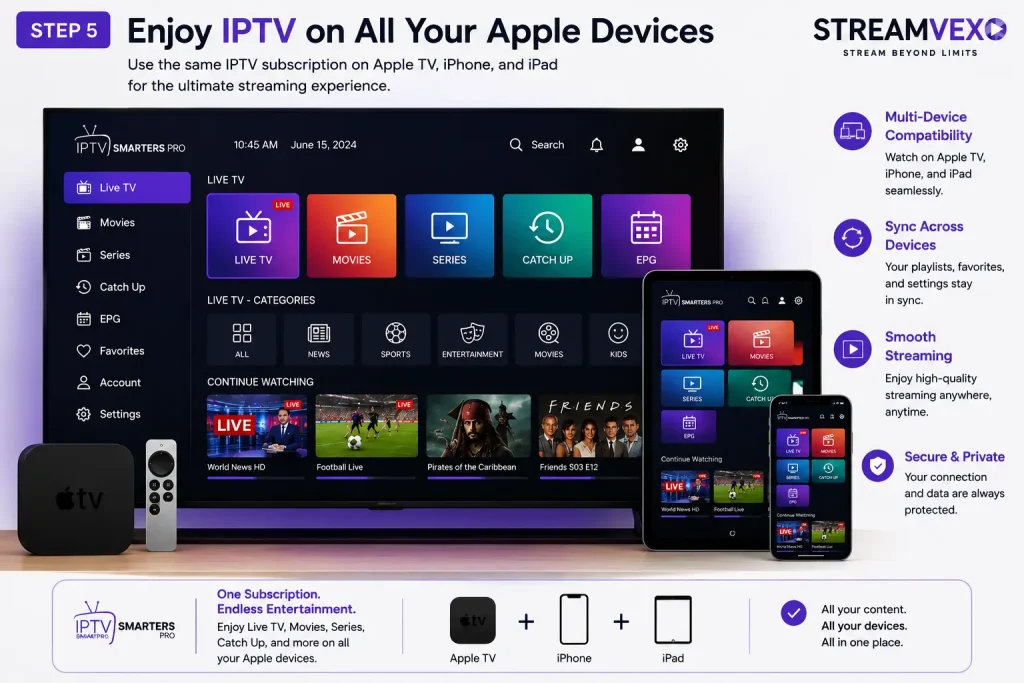
Step 7: Set Up IPTV on Apple TV
If you're using an Apple TV, the process is similar, although the interface and installation steps can differ slightly from iPhone and iPad.
Start by opening the App Store on your Apple TV.
Search for a compatible IPTV player and install it if available for your Apple TV model and region.
After installation:
- Open the IPTV player.
- Accept any required terms.
- Select the option to add a user or IPTV playlist.
- Enter the IPTV credentials provided by your provider.
- Wait for your channels and other available content to load.
- Browse the available categories.
Once everything is loaded, you can use your Apple TV remote to navigate through the IPTV application.
Step 8: Check Your Internet Connection
A stable internet connection is important for a smooth IPTV experience.
If you experience buffering, freezing, or playback interruptions, check your connection before assuming there is a problem with the IPTV application.
Try the following:
- Check your internet speed.
- Restart your router.
- Move closer to your Wi-Fi router.
- Use a wired connection where supported.
- Close applications that are using significant bandwidth.
- Restart your Apple device.
- Check whether the issue occurs on multiple channels.
You can also contact your IPTV provider if the problem continues.
Remember that streaming performance can depend on several factors, including your internet connection, home network, device, application, server conditions, and the content being accessed.
Step 9: Keep Your IPTV App Updated
Keeping your IPTV player and Apple device updated can help maintain compatibility and security.
Check the App Store periodically for available application updates.
You should also keep your iPhone, iPad, or Apple TV operating system updated when appropriate.
An outdated application or operating system can sometimes cause compatibility problems.
Common IPTV Setup Problems on Apple Devices
Even when the setup process is simple, users may occasionally experience problems.
Here are some of the most common issues.
IPTV Login Doesn't Work
If your IPTV credentials don't work:
- Check your username.
- Check your password.
- Make sure there are no extra spaces.
- Verify the server or playlist URL.
- Confirm that your subscription is active.
- Try entering the information again.
If you're still unable to connect, contact your IPTV provider.
Channels Are Not Loading
If the application opens but your channels don't appear, check:
- Your internet connection.
- Your IPTV credentials.
- Your subscription status.
- The server URL.
- Whether the IPTV service is currently experiencing an issue.
Restarting the application can also help.
IPTV Is Buffering
Buffering can have several possible causes.
Your first step should be to test your internet connection.
If other streaming services are also experiencing problems, the issue may be related to your internet connection or home network.
If only certain IPTV channels are affected, contact your IPTV provider for assistance.
EPG Is Not Showing
If the Electronic Program Guide isn't displaying information, the EPG may not be included with your IPTV subscription or the relevant guide information may not currently be available.
Check with your provider if EPG support is included with your subscription.
Is IPTV Smarters Pro Available on Every Apple Device?
Availability can change depending on the application developer, device model, operating system version, and App Store region.
Before installing an IPTV application, check the current App Store listing to confirm that the application supports your specific device.
If IPTV Smarters Pro isn't available on your device, you may need to use another compatible IPTV player.
Final Thoughts
Setting up IPTV on an iPhone, iPad, or Apple TV doesn't have to be complicated.
With a compatible IPTV player, a stable internet connection, and the correct subscription information, you can quickly connect your IPTV service and start exploring the available content.
The basic process is:
Download the IPTV player → Open the application → Enter your IPTV details → Load your content → Explore your channels → Customize your viewing experience.
If you run into problems during setup, check your credentials and internet connection first. If the issue continues, contact your IPTV provider for assistance.
For StreamVexo customers, our support team can also help with general setup and connection guidance for compatible devices.
Ready to Start Watching IPTV on Your Apple Device?
Now that you've learned how to set up IPTV on your Apple TV, iPhone, or iPad, you're just one step away from enjoying thousands of live TV channels, movies, series, and sports in high quality.
Get your IPTV subscription today and start streaming in minutes!
👉 Visit: https://streamvexo.com
📱 WhatsApp: +1 619 837 1809
If you want to watch live TV, movies, sports, and series on your Amazon Fire TV Stick, setting up IPTV is simple with the right IPTV player. In this guide, you'll learn how to set up IPTV on Fire TV Stick step by step, from installing an IPTV player to logging in with your IPTV subscription and organizing your channels.
Important: IPTV Smarters Pro is a media player. You'll need an active IPTV subscription and the login details provided by your IPTV service provider.
What You'll Need Before Getting Started
Before installing IPTV on your Fire TV Stick, make sure you have:
- An Amazon Fire TV Stick or Fire TV Cube
- A stable internet connection
- IPTV Smarters Pro or another compatible IPTV player
- An active IPTV subscription
- IPTV username
- IPTV password
- Server/Portal URL or M3U Playlist URL
Once you have these details, you're ready to begin.
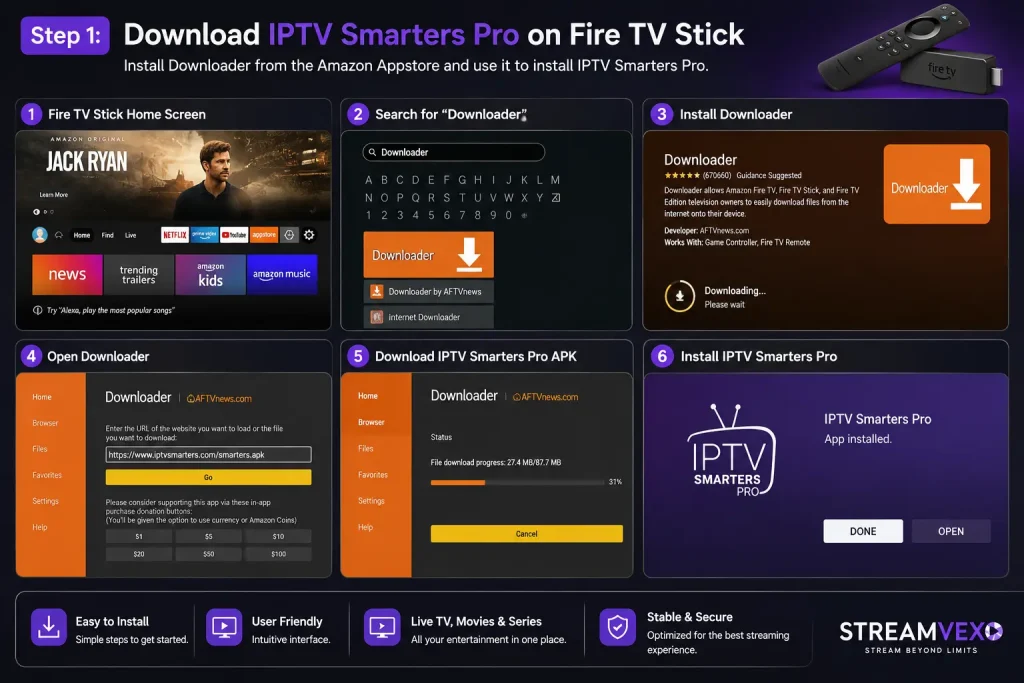
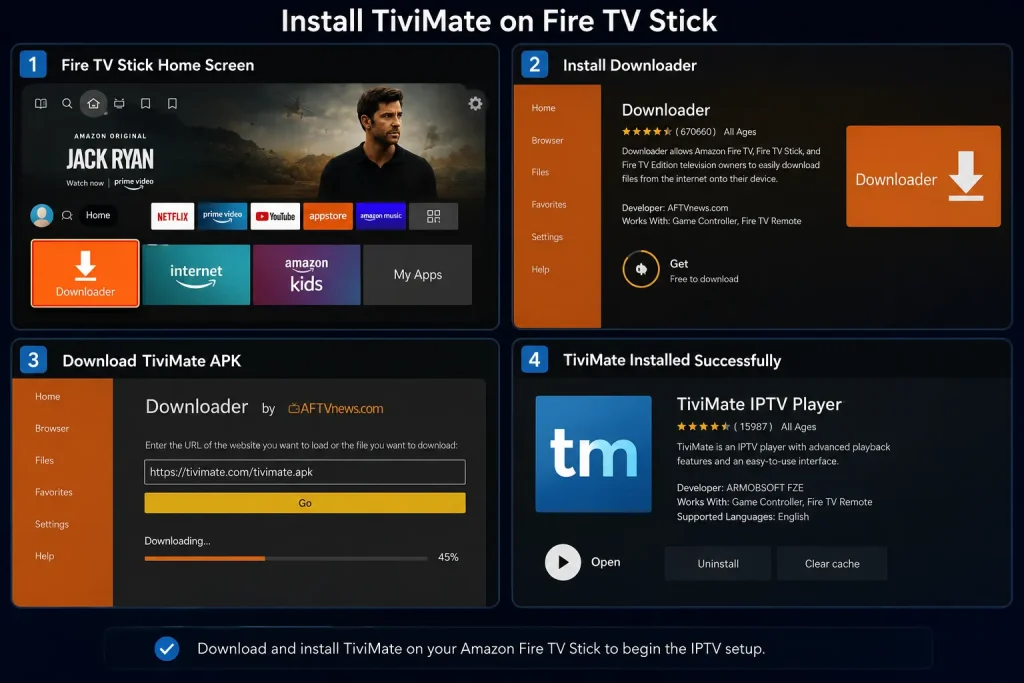
Step 1: Download IPTV Smarters Pro on Fire TV Stick
Unlike Android phones, IPTV Smarters Pro may not always be available directly from the Amazon Appstore. Depending on your region, you may need to install it using the Downloader app.
Typical installation steps:
- Turn on your Fire TV Stick.
- Open the Amazon Appstore.
- Search for Downloader.
- Install Downloader.
- Enable Install Unknown Apps if required.
- Download and install IPTV Smarters Pro.
- Launch the application.
Step 2: Accept the Terms
Open IPTV Smarters Pro after installation.
Depending on the version, you'll be asked to accept the application's terms and conditions.
Simply:
- Open IPTV Smarters Pro.
- Review the Terms.
- Select Accept.
- Continue to the login screen.
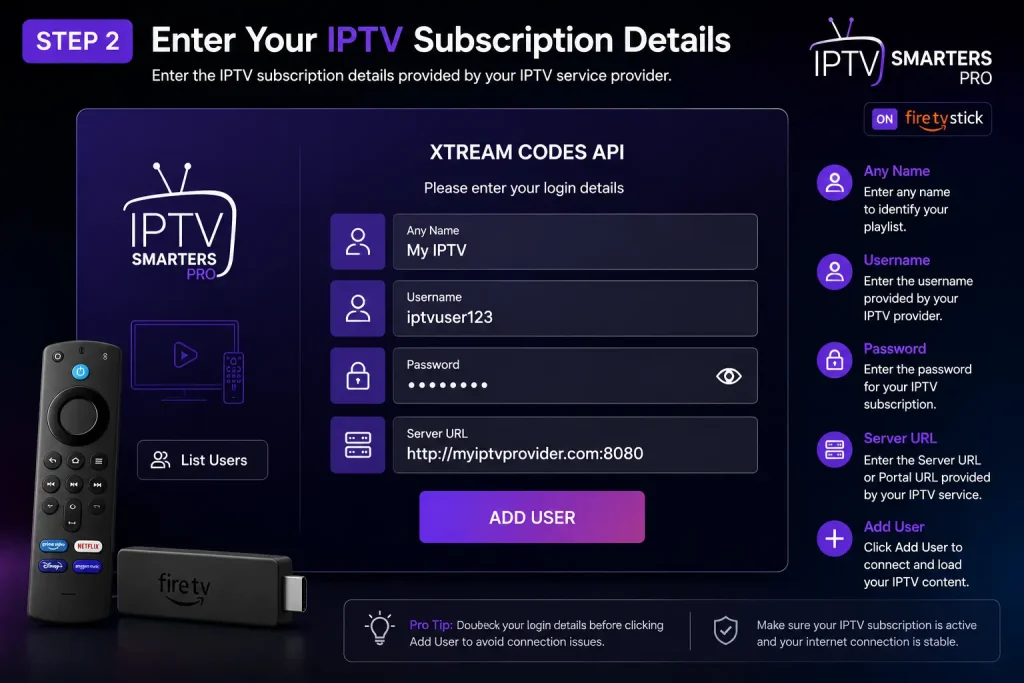
Step 3: Enter Your IPTV Subscription Details
To connect your IPTV service:
Enter:
- Any Name
- Username
- Password
- Server URL
Verify that all information is entered exactly as provided by your IPTV provider.
Once completed:
Click Add User.
The application will verify your account and begin loading your IPTV subscription.
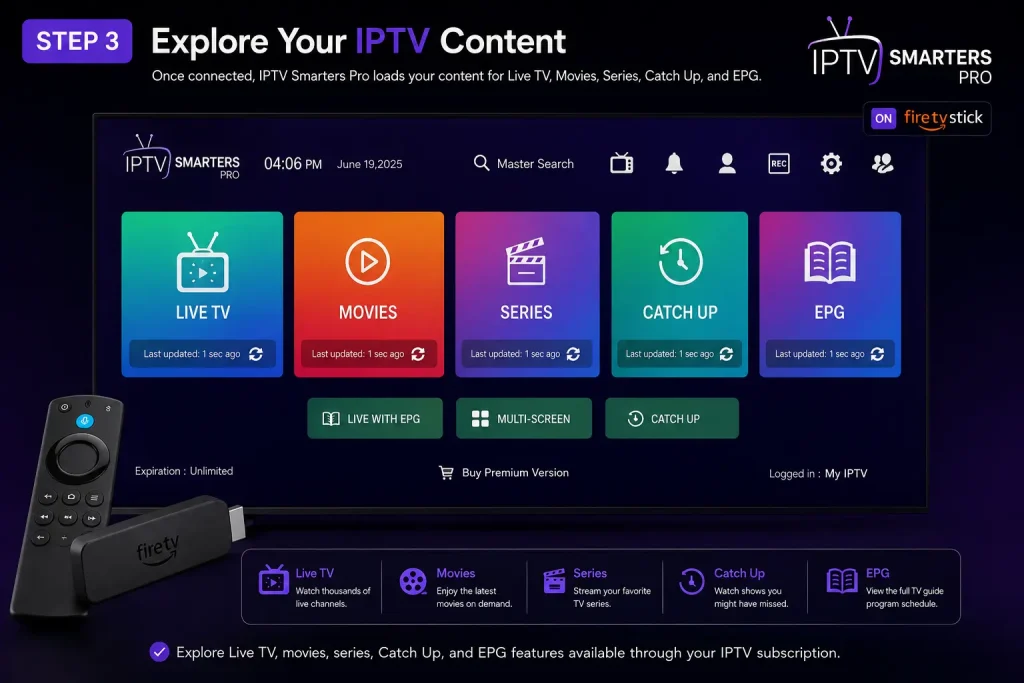
Step 4: Explore Your IPTV Content
Once connected successfully, IPTV Smarters Pro will automatically load your content.
Most IPTV subscriptions include:
- Live TV
- Movies
- TV Series
- Catch Up
- EPG
- Favorites
Use the remote control to browse categories and begin watching your favorite content.
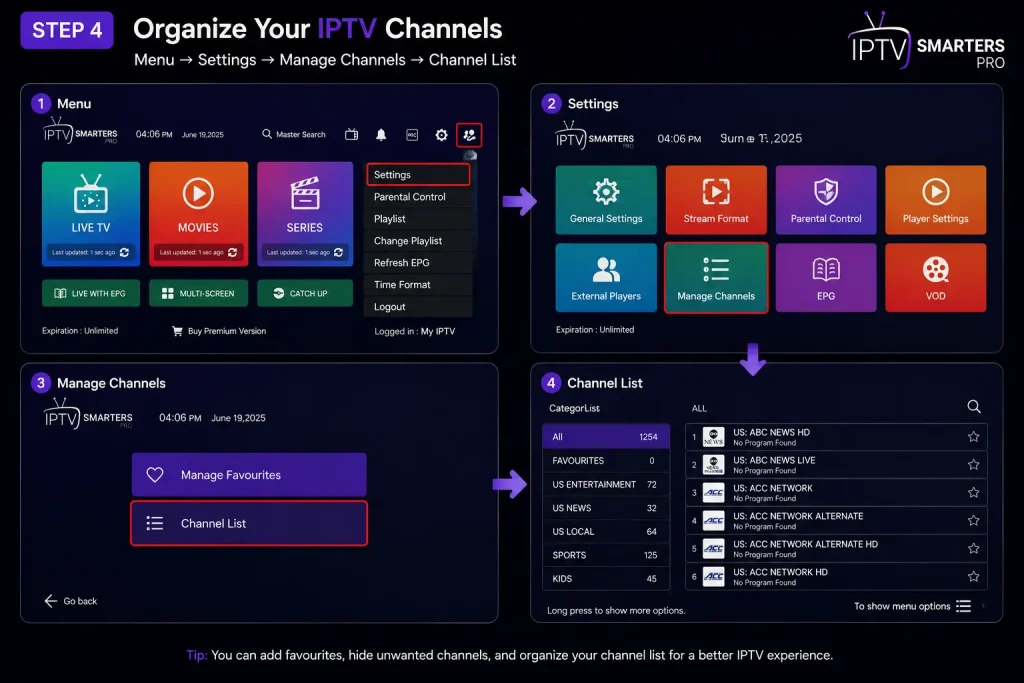
Step 5: Organize Your IPTV Channels
To make navigation easier:
- Open Menu
- Select Settings
- Open Manage Channels
- View Channel List
You can organize favorites, hide channels, or customize your viewing experience.
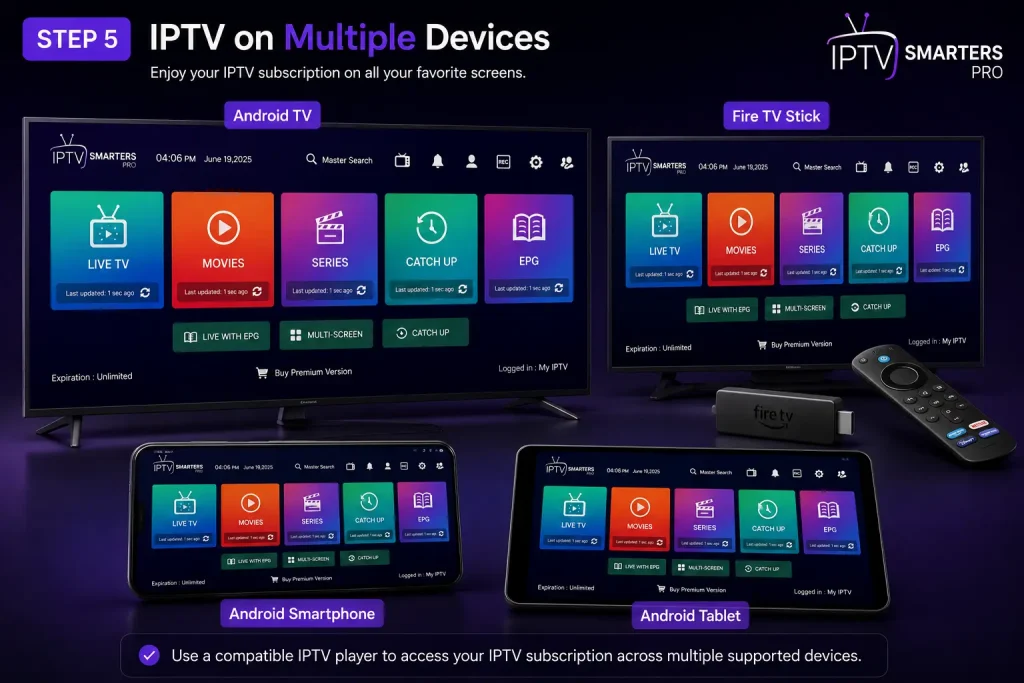
Step 6: Enjoy IPTV Across Multiple Devices
Many IPTV subscriptions support multiple compatible devices.
You can enjoy IPTV on:
- Fire TV Stick
- Android TV
- Smart TVs
- Android Phones
- Tablets
Your experience remains consistent across supported devices.
Step 7: Improve Streaming Performance
For the best viewing experience:
- Use a high-speed internet connection.
- Restart your Fire TV Stick regularly.
- Keep IPTV Smarters Pro updated.
- Restart your router if buffering occurs.
- Use 5 GHz Wi-Fi whenever possible.
- Close background applications.
Common IPTV Problems on Fire TV Stick
IPTV Login Doesn't Work
If you cannot log in:
- Verify Username
- Verify Password
- Verify Server URL
- Ensure your subscription is active
Channels Are Missing
Check:
- Internet connection
- IPTV credentials
- IPTV subscription status
Restart the application if necessary.
IPTV Keeps Buffering
Buffering is often related to:
- Slow internet
- Wi-Fi interference
- Heavy network traffic
Using Ethernet (with a compatible adapter) or a stronger Wi-Fi signal can improve performance.
EPG Isn't Loading
If the TV Guide isn't available:
- Refresh the application.
- Verify EPG support with your IPTV provider.
Keep Your Fire TV Stick Updated
Keep both your Fire TV operating system and IPTV player updated to ensure compatibility, better performance, and improved security.
Frequently Asked Questions
Can I install IPTV on any Fire TV Stick?
Yes. Most Amazon Fire TV Stick models support compatible IPTV players.
Do I need Downloader?
Depending on your region and the app's availability in the Amazon Appstore, you may need the Downloader app to install IPTV Smarters Pro.
Can I use the same IPTV subscription on multiple devices?
This depends on your IPTV provider and subscription plan. Some subscriptions allow multiple simultaneous connections, while others support only one device at a time.
Why is IPTV buffering on Fire TV Stick?
Buffering is commonly caused by slow internet, Wi-Fi interference, or network congestion. Restarting your router or using a faster connection often helps.
Ready to Watch IPTV on Your Fire TV Stick?
Now that you know how to install and configure IPTV on your Amazon Fire TV Stick, you're ready to enjoy live TV, movies, series, sports, Catch Up, and EPG in just a few minutes.
Whether you're streaming at home or on the go, a compatible IPTV player and a reliable IPTV subscription make it easy to access your favorite entertainment.
Get started today!
🌐 Website: https://streamvexo.com
📱 WhatsApp: +1 619 837 1809
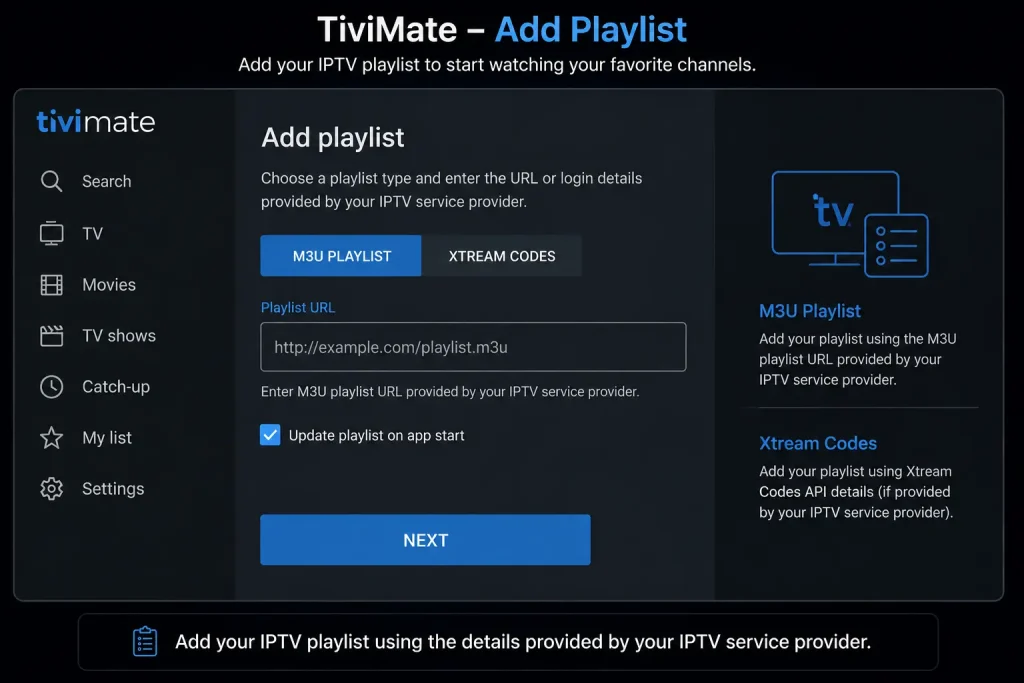
Setting up IPTV on your Smart TV is quick and easy. Follow the steps below to get your StreamVexo IPTV service ready to use on compatible Samsung, LG, and other Smart TVs.
Step 1: Download an IPTV App
Open the App Store on your Smart TV and search for a compatible IPTV application, such as:
- SetIPTV
- NetIPTV
- Smart IPTV
Choose the application available for your TV and install it.
Note: App availability may vary depending on your Smart TV model, operating system, and region.
Step 2: Open the IPTV App
Once the application has been installed, open it on your Smart TV.
You should see information on the screen, including your TV's MAC Address.
Example:00:1A:2B:3C:4D:5E
Keep this information available for the next step.
Step 3: Send Us Your MAC Address
Send your MAC Address to the StreamVexo support team through your available support channel, such as:
- WhatsApp: Click Here To start chat
- Live Chat
Our team will use the information to process your IPTV activation.
Important: Only send your MAC Address through the official StreamVexo support channels.
Step 4: Restart Your Smart TV
After your IPTV service has been activated, wait a few minutes and then:
- Close the IPTV application.
- Restart or reboot your Smart TV.
- Open the IPTV application again.
- Your IPTV service should now be available.
🎉 Done!
That's it! Your Smart TV should now be ready to access your StreamVexo IPTV service.
If you need help during the setup process, contact our support team for assistance.
Ready to Set Up IPTV on Your Smart TV?
Get started with StreamVexo and enjoy a smooth streaming experience on your compatible Smart TV.
Need help with setup? Our support team is available to guide you through the activation process and answer your questions.
👉 Start your StreamVexo subscription today and get your Smart TV ready for streaming!
Visit: StreamVexo.com
Support: Contact our team through WhatsApp
Want to watch IPTV on your Roku TV or Roku streaming device? The setup is a little different from Fire TV Stick because Roku does not support Android APK files.
In this guide, we'll show you the simplest ways to set up IPTV on Roku, including using a compatible Roku app or casting IPTV from your phone.
Important: IPTV apps and channels available on Roku can vary by country and device. Only use IPTV services and content that you are legally entitled to access.
What You Need
Before starting, make sure you have:
- A Roku TV or Roku streaming device
- A stable internet connection
- A Roku account
- A compatible IPTV app or casting method
- An IPTV subscription or playlist
- Your IPTV login details, if required
Step 1: Connect Roku to the Internet
Turn on your Roku and connect it to your TV.
From the Roku home screen, go to:
Settings → Network → Set up connection
Select Wireless, choose your Wi-Fi network, and enter your password.
Make sure Roku is successfully connected before continuing.
Step 2: Open the Roku Streaming Store
From the Roku Home screen, open the Streaming Store.
Select Search and look for an IPTV-compatible application available for your Roku device and region.
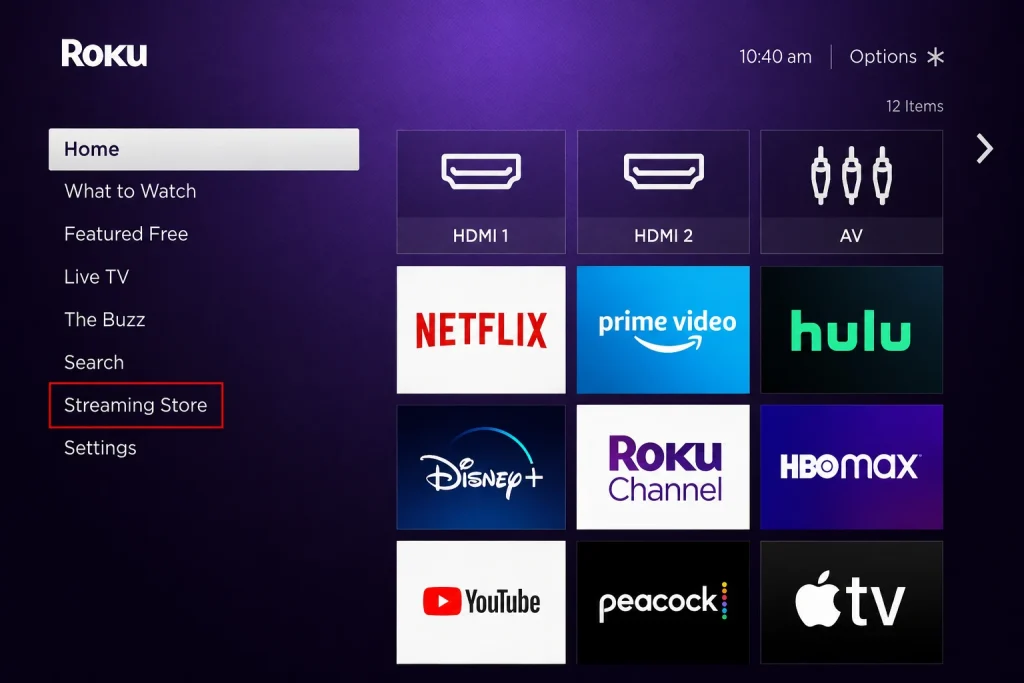
Note: Roku does not support Android APK applications, so you cannot install Fire TV or Android IPTV APKs directly on Roku.
Step 3: Find and Install a Compatible IPTV App
Search for the IPTV application you want to use.
Open the application's page and check that it is compatible with your Roku device.
If it is available, select Add app to install it.
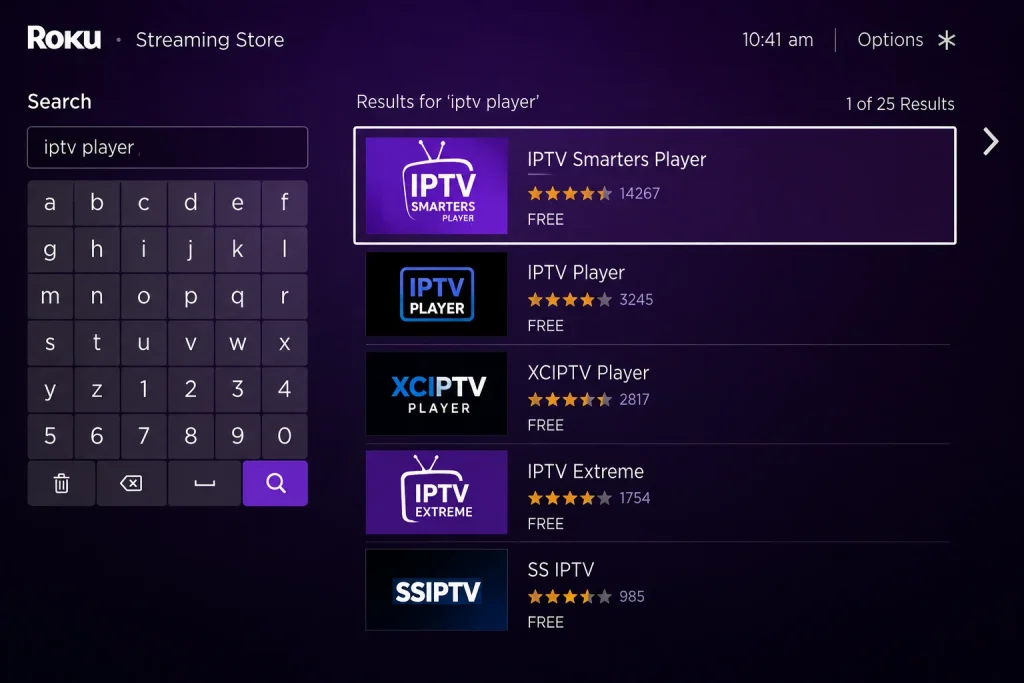
After installation, the application will appear on your Roku Home screen.
Step 4: Open the IPTV App and Add Your Subscription
Open the IPTV application.
Depending on the app, you may need to enter:
- Username
- Password
- Server URL
- M3U playlist
- Activation code
Enter the information provided by your IPTV provider and follow the instructions shown on the screen.
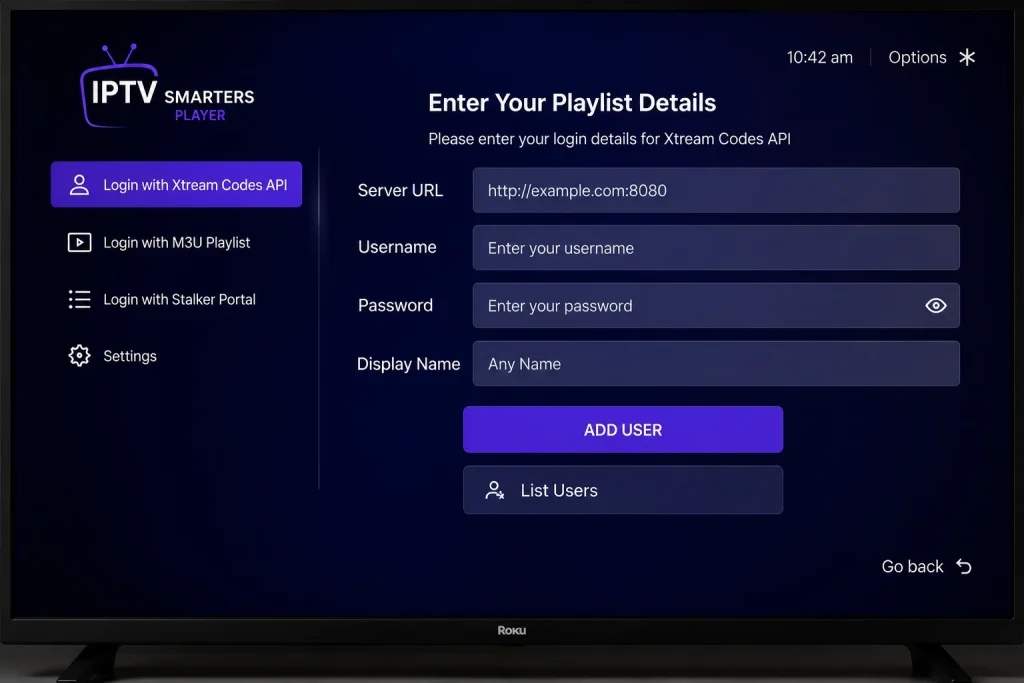
Once your playlist loads, you can access the content available through your IPTV service.
Step 5: Cast IPTV From Your Phone to Roku
If you cannot find a suitable IPTV application in the Roku Streaming Store, casting can be another option.
Make sure your phone and Roku are connected to the same Wi-Fi network.
Open a compatible IPTV application on your phone, start playing content, and tap the Cast icon if the application supports Roku casting.
Select your Roku device and the content should appear on your TV.
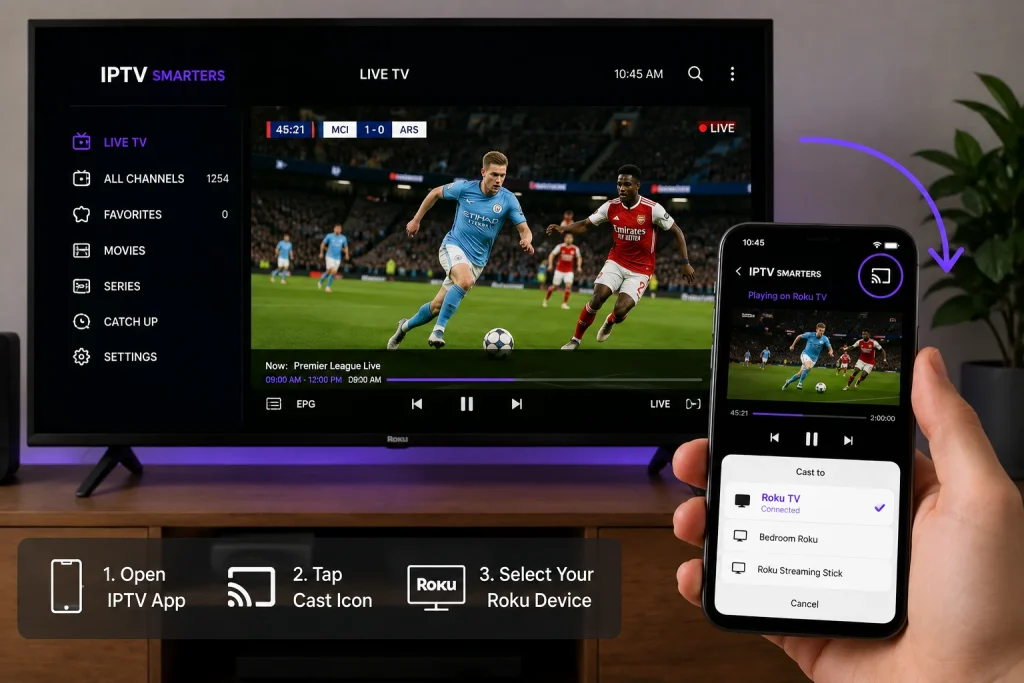
IPTV Not Working on Roku?
If your IPTV isn't working, try these quick solutions:
Check your internet
Make sure your Roku has a stable internet connection.
Check your IPTV details
Verify your username, password, server URL, or playlist URL.
Restart Roku
Restart your Roku device and try opening the IPTV app again.
Check app availability
Some IPTV applications may not be available in your country or on your Roku model.
Check casting
If you're casting from your phone, make sure both devices are connected to the same Wi-Fi network.
Can I Install IPTV Smarters or TiviMate on Roku?
Roku does not support Android APK files, so you cannot install an Android IPTV application on Roku in the same way you would on Fire TV Stick or Android TV.
Instead, check the Roku Streaming Store for a compatible application or use a supported casting method.
Need Help Setting Up IPTV on Roku?
Having trouble finding an IPTV app, adding your playlist, or casting IPTV to your Roku TV?
📲 WhatsApp: +1 619 837 1809
Contact us on WhatsApp and we'll help you with your Roku IPTV setup step by step.
FAQ
Can I watch IPTV on Roku?
Yes. You can use a compatible Roku application or cast supported IPTV content from another device.
Can I install an IPTV APK on Roku?
No. Roku does not support Android APK files. You need a Roku-compatible application or supported casting method.
Can I watch IPTV from my phone on Roku?
Yes, when your IPTV application supports compatible casting or screen mirroring.
Do I need an IPTV subscription?
Yes. An IPTV player or casting application does not provide channels by itself. You need a legitimate IPTV subscription or playlist.
Conclusion
Setting up IPTV on Roku is different from setting up IPTV on Fire TV Stick. Roku does not use Android APK files, so the easiest options are to install a compatible Roku application or cast IPTV from a supported device.
Follow the steps above, check your internet connection, and make sure your IPTV login information is entered correctly.
Are you looking to enjoy IPTV on your Windows PC or Mac? Setting up IPTV on your computer is simple when you have a compatible IPTV player and an active subscription.
In this guide, we'll walk you through the basic steps to install an IPTV player, enter your StreamVexo subscription details, and start watching IPTV on your PC or Mac.
Note: IPTV player applications may have different names, interfaces, and setup options depending on your operating system and the version you are using.
Step 1: Choose a Compatible IPTV Player
Start by choosing an IPTV player that supports your computer.
If you're using:
- Windows PC: Choose an IPTV player compatible with Windows.
- Mac: Choose an IPTV player compatible with macOS.
Make sure you download the application from its official website, trusted app store, or another reputable source.
Your IPTV player should support the connection method provided with your StreamVexo subscription, such as an M3U playlist or compatible login details.
Step 2: Download the IPTV Player
Once you've selected a compatible application:
- Open your web browser on your PC or Mac.
- Visit the official website or trusted download source for the IPTV player.
- Select the version compatible with your operating system.
- Download the application.
- Wait for the download to finish.
Always check that the application supports your current version of Windows or macOS before installing it.
Step 3: Install the Application
After downloading the IPTV player:
- Open the downloaded installation file.
- Follow the instructions displayed on your screen.
- Allow the installation to complete.
- Open the IPTV player once installation is finished.
On macOS, you may need to move the application to your Applications folder before opening it.
Step 4: Enter Your StreamVexo Subscription Details
After opening the IPTV player, you'll need to connect it to your IPTV subscription.
Depending on the application, you may see an option such as:
- Add User
- Add Playlist
- Login
- Load M3U
- Add IPTV
- Xtream Codes
Select the option that matches the information provided with your StreamVexo subscription.
You may need to enter:
Username: Your StreamVexo username
Password: Your StreamVexo password
Server URL: The server address provided with your subscription
If you received an M3U playlist URL, copy and paste it into the appropriate playlist field.
Make sure your information is entered exactly as provided.
Important: Never use the example information from a guide as your actual login details. Use the credentials provided with your own subscription.
Step 5: Load Your IPTV Content
After entering your subscription information, select Login, Connect, Add User, or the equivalent option in your IPTV player.
The application will then connect to your IPTV service and load your available content.
Depending on your subscription, you may have access to sections such as:
- Live TV
- Movies
- Series
- EPG / TV Guide
- Catch Up
- Favorites
The available content and features depend on your IPTV subscription.
Step 6: Explore IPTV on Your PC or Mac
Once your content has loaded, you can start exploring your IPTV service.
Select Live TV to browse available channels, or explore other sections such as Movies and Series if they are included with your subscription.
You can also use features supported by your IPTV player, such as:
- Channel categories
- Favorites
- Search
- EPG
- Subtitles
- Audio options
- Playback controls
Take a few minutes to explore the application and customize it according to your preferences.
Step 7: Start Watching IPTV
That's it!
Once your IPTV player is connected to your StreamVexo subscription, you can select a channel or other available content and start streaming on your Windows PC or Mac.
For the best experience, make sure your computer has a stable internet connection and that your IPTV player is up to date.
Troubleshooting IPTV on PC or Mac
IPTV Login Doesn't Work
If you cannot connect, check your:
- Username
- Password
- Server URL
- M3U playlist URL
- Subscription status
Make sure there are no extra spaces or typing errors.
IPTV Content Isn't Loading
Check your internet connection and make sure your subscription information is correct.
You can also close and restart the IPTV player before trying again.
IPTV Is Buffering
Buffering can be caused by several factors, including your internet connection, Wi-Fi quality, network congestion, device performance, or the streaming source.
Try restarting your router, closing applications that use your internet connection, or using a wired connection if available.
If the issue continues, contact your IPTV provider for assistance.
Enjoy IPTV on Windows or Mac
Setting up IPTV on your computer doesn't have to be complicated.
Simply:
Choose a compatible IPTV player → Download it → Install it → Enter your StreamVexo details → Load your content → Start watching.
Whether you're using a Windows PC or Mac, you can enjoy your IPTV subscription directly from your computer without needing a Smart TV or additional hardware.
🚀 Ready to Start Streaming?
Get your StreamVexo subscription and set up IPTV on your compatible PC or Mac today.
Need help? Our support team is available to assist you with setup, subscription information, and general technical questions.
Start your StreamVexo experience today and enjoy IPTV on your computer!
STB Emulator is an IPTV player that can emulate certain set-top-box environments and connect to a compatible IPTV portal.
If you have a compatible StreamVexo subscription and have received your activation information, follow the steps below to set up IPTV using STB Emulator on your Android device.
Important: STB Emulator is a third-party application. Its interface and available options may change depending on the version you are using.
Step 1: Download STB Emulator
Open the Google Play Store on your Android device.
- Search for STB Emulator.
- Select the appropriate application.
- Install the app on your device.
- Open the application after installation.
Make sure you download the application from a trusted source.
Step 2: Find Your MAC Address
After opening STB Emulator for the first time, the application may display your device's MAC Address.
You may need this information to activate or connect your IPTV subscription.
Example:
00:1A:2B:3C:4D:5E
If your StreamVexo activation process requires your MAC Address, send it to our support team through the official support channel provided to you.
Important: Never publish your MAC Address publicly. Only share it with your IPTV provider through an official support channel.
Step 3: Open the Settings Menu
Once STB Emulator is open:
- Look at the top-right area of the screen.
- Select the Settings icon.
- Open the application settings.
The location and appearance of the settings icon may vary depending on your version of STB Emulator.
Step 4: Open Profiles
Inside the Settings menu:
- Select Profiles.
- You may see an existing profile.
- Select the existing profile to modify it, or choose Add Profile to create a new one.
Creating a new profile can be useful if you want to keep different configurations separate.
Step 5: Select the STB Model
After opening your profile:
- Select STB Model.
- Choose the model that matches the configuration provided for your IPTV service.
- If your activation instructions specify MAG 250, select MAG 250.
The available models may vary depending on the version of STB Emulator.
Step 6: Enter Your Portal URL
Next, open Portal Settings.
You will see a field where you can enter your IPTV portal address.
Enter the Portal URL provided in your StreamVexo activation information.
Make sure the URL is entered exactly as provided.
Then select OK or Save.
Important: Do not use a random Portal URL from the internet. Use the portal information provided with your own subscription.
Step 7: Select the Screen Resolution
Return to the relevant settings and select Screen Resolution.
Choose a resolution that works well with your device and internet connection.
For example:
1280 × 720
You may be able to select a higher resolution if your device and internet connection can handle it.
For higher-quality streaming, a stable and sufficiently fast internet connection is recommended.
Step 8: Restart STB Emulator
After completing the configuration:
- Exit STB Emulator.
- Close the application completely.
- Open STB Emulator again.
- Allow the application to connect to your IPTV portal.
If the setup information is correct and your subscription is active, your available IPTV content should load.
Your IPTV Setup Is Complete
Once STB Emulator successfully connects to your IPTV portal, you should be able to access the available channel list and other content included with your subscription.
You can then browse the available channels and start watching supported content.
Troubleshooting STB Emulator
If your channels don't appear or the application doesn't connect, try the following steps.
1. Restart STB Emulator
Close the application completely and open it again.
2. Restart Your Android Device
Restart your phone, tablet, Android TV device, or compatible box.
3. Restart Your Router
Turn your Wi-Fi router off, wait a few seconds, and turn it back on.
Wait until your internet connection is fully restored before opening STB Emulator again.
4. Check Your Portal URL
Make sure the Portal URL matches the information provided with your StreamVexo activation.
A single missing character or extra space can prevent the application from connecting.
5. Check Your Subscription
Make sure your StreamVexo subscription is active and that the activation information is correct.
6. Contact Support
If you've followed all the steps and still cannot access your channels, contact the StreamVexo support team.
Our team can help you check your setup information and guide you through the configuration process.
Frequently Asked Questions
What is STB Emulator?
STB Emulator is a third-party application designed to emulate certain IPTV set-top-box environments and connect to compatible IPTV portals.
Do I need a StreamVexo subscription?
Yes. STB Emulator is an IPTV player/emulator and does not independently provide television channels. You need a compatible IPTV service and the required portal information.
Where can I find my Portal URL?
Your Portal URL should be provided by your IPTV service provider. For StreamVexo customers, check your activation information or contact our support team if you cannot find it.
Why is my MAC Address important?
Some IPTV portal configurations use a MAC Address to identify or activate a compatible device. If your activation process requires one, follow the instructions provided by your IPTV provider.
Why isn't my channel list showing?
First, restart STB Emulator, your Android device, and your Wi-Fi router. Then check that your Portal URL and other configuration settings are correct.
If the problem continues, contact StreamVexo support.
Final Thoughts
Setting up IPTV with STB Emulator can be completed in a few simple steps:
Install STB Emulator → Find your MAC Address → Open Settings → Create or select a Profile → Choose the STB Model → Enter your Portal URL → Select your resolution → Restart the app → Start watching.
If you need assistance, StreamVexo support is available to help you with the setup and activation process.
🚀 Need Help Setting Up STB Emulator?
Having trouble connecting your IPTV subscription?
Contact the StreamVexo support team through WhatsApp, Email, or Live Chat, and we'll guide you through the setup process.
Start your StreamVexo experience today and get your IPTV ready to stream!
Connect your MAG device to your TV and Internet, then follow these simple steps.
Step 1: Open Portal Settings
On your MAG remote, go to:
Settings → System Settings → Servers → Portals
Step 2: Enter Portal 1
Set:
Portal 1 Name: StreamVexo
Portal 1 URL: Enter the Portal URL provided in your activation email.
Step 3: Portal 2
If you have only one subscription, leave Portal 2 Name and Portal 2 URL empty.
Only add Portal 2 if you purchased a second subscription.
Step 4: Save & Reboot
Save your settings and restart your MAG device.
After the device restarts, wait a few moments for your channels to load.
🎉 Done!
Your MAG device should now be connected to your IPTV service.
Need help? Contact the StreamVexo support team through WhatsApp, Email, or Live Chat, and we'll help you with the setup.